Tuesday, March 5, 2013

How To Add Related Post With Thumbnails to Blogger

12 comments
This is a great blogger hack from www.bloggerplugins.org .In this post I explain how to add this related post widget to blogger by hosting java script in blogger.It will help your template load faster.But If you don't want this method read the original article from here.
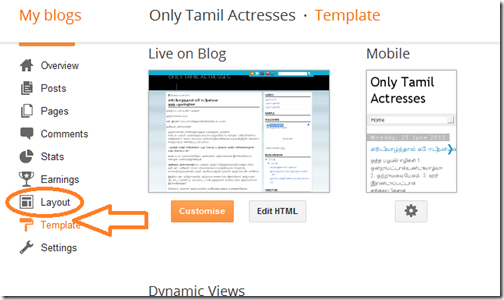
1.Login to your blogger dashboard--> layout- -> Edit HTML
2.Click on "Expand Widget Templates"
3.Scroll down to where you see </head> tag.
4.Copy below code and paste it just before </head> tag.
<!--Related Posts with thumbnails Scripts and Styles Start-->
<b:if cond='data:blog.pageType == &quot;item&quot;'>
<style type='text/css'>
#related-posts {
float:center;
text-transform:none;
height:100%;
min-height:100%;
padding-top:5px;
padding-left:5px;
}

#related-posts h2{
font-size: 1.6em;
font-weight: bold;
color: black;
font-family: Georgia, &#8220;Times New Roman&#8221;, Times, serif;
margin-bottom: 0.75em;
margin-top: 0em;
padding-top: 0em;
}
#related-posts a{
color:black;
}
#related-posts a:hover{
color:black;
}

#related-posts  a:hover {
background-color:#d4eaf2;
}
</style>
<script type='text/javascript'>
//<![CDATA[

//Script by Aneesh of www.bloggerplugins.org
//Released on August 19th August 2009
var relatedTitles = new Array();
var relatedTitlesNum = 0;
var relatedUrls = new Array();
var thumburl = new Array();
function related_results_labels_thumbs(json) {
for (var i = 0; i < json.feed.entry.length; i++) {
var entry = json.feed.entry[i];
relatedTitles[relatedTitlesNum] = entry.title.$t;
try
{thumburl[relatedTitlesNum]=entry.media$thumbnail.url;}


catch (error){
s=entry.content.$t;a=s.indexOf("<img");b=s.indexOf("src=\"",a);c=s.indexOf("\"",b+5);d=s.substr(b+5,c-b-5);if((a!=-1)&&(b!=-1)&&(c!=-1)&&(d!="")){
thumburl[relatedTitlesNum]=d;} else thumburl[relatedTitlesNum]='https://blogger.googleusercontent.com/img/b/R29vZ2xl/AVvXsEjMwnIPzWdzTSqmzG4OYytfEIkr4yv5yNUX-lKfMqeiW-zinNq9gRGWgwifHfLTP__GdP3sdWmne7feA76LWFUM6gBq5hVqIRh42uEhrJwp8B0cOCJS4RzPZe2kaKgaG1HavxyVBPt3nrk/s400/noimage.png';


}

if(relatedTitles[relatedTitlesNum].length>35) relatedTitles[relatedTitlesNum]=relatedTitles[relatedTitlesNum].substring(0, 35)+"...";
for (var k = 0; k < entry.link.length; k++) {
if (entry.link[k].rel == 'alternate') {
relatedUrls[relatedTitlesNum] = entry.link[k].href;
relatedTitlesNum++;


}
}
}
}
function removeRelatedDuplicates_thumbs() {
var tmp = new Array(0);
var tmp2 = new Array(0);
var tmp3 = new Array(0);
for(var i = 0; i < relatedUrls.length; i++) {
if(!contains_thumbs(tmp, relatedUrls[i]))
{
tmp.length += 1;
tmp[tmp.length - 1] = relatedUrls[i];
tmp2.length += 1;
tmp3.length += 1;
tmp2[tmp2.length - 1] = relatedTitles[i];
tmp3[tmp3.length - 1] = thumburl[i];
}
}
relatedTitles = tmp2;
relatedUrls = tmp;
thumburl=tmp3;


}

function contains_thumbs(a, e) {
for(var j = 0; j < a.length; j++) if (a[j]==e) return true;
return false;
}
function printRelatedLabels_thumbs() {
for(var i = 0; i < relatedUrls.length; i++)
{
if((relatedUrls[i]==currentposturl)||(!(relatedTitles[i])))
{
relatedUrls.splice(i,1);
relatedTitles.splice(i,1);
thumburl.splice(i,1);

}
}


var r = Math.floor((relatedTitles.length - 1) * Math.random());
var i = 0;

if(relatedTitles.length>0) document.write('<h2>'+relatedpoststitle+'</h2>');
document.write('<div style="clear: both;"/>');
while (i < relatedTitles.length && i < 20 && i<maxresults) {


document.write('<a style="text-decoration:none;padding:5px;float:left;');
if(i!=0) document.write('border-left:solid 0.5px #d4eaf2;"');
else document.write('"');
document.write(' href="' + relatedUrls[r] + '"><img style="width:72px;height:72px;border:0px;" src="'+thumburl[r]+'"/><br/><div style="width:72px;padding-left:3px;height:65px;border: 0pt none ; margin: 3px 0pt 0pt; padding: 0pt; font-style: normal; font-variant: normal; font-weight: normal; font-size: 12px; line-height: normal; font-size-adjust: none; font-stretch: normal;">'+relatedTitles[r]+'</div></a>');


if (r < relatedTitles.length - 1) {
r++;
} else {
r = 0;
}
i++;
}
document.write('</div>');

}

//]]>
</script>
</b:if>
<!--Related Posts with thumbnails Scripts and Styles End-->
5.Now scroll down to where you see below code:
<div class='post-footer-line post-footer-line-1'>
NOTE: If you can't find <div class='post-footer-line post-footer-line-1'> in your template,find <data:post.body> instead of it.
6.Copy below code and paste it just after above code.
<!-- Related Posts with Thumbnails Code Start-->
<b:if cond='data:blog.pageType == &quot;item&quot;'>
<div id='related-posts'>
<b:loop values='data:post.labels' var='label'>
<b:if cond='data:label.isLast != &quot;true&quot;'>
</b:if>
<b:if cond='data:blog.pageType == &quot;item&quot;'>
<script expr:src='&quot;/feeds/posts/default/-/&quot; + data:label.name + &quot;?alt=json-in-script&amp;callback=related_results_labels_thumbs&amp;max-results=6&quot;' type='text/javascript'/></b:if></b:loop><a href='http://www.bloggerplugins.org/2009/08/related-posts-thumbnails-blogger-widget.html' style='display:none;'>Related Posts with thumbnails for blogger</a><a href='http://www.bloggerplugins.org/' style='display:none;'>blogger tutorials</a>
<script type='text/javascript'>
var currentposturl=&quot;<data:post.url/>&quot;;
var maxresults=5;
var relatedpoststitle="Related Posts";
removeRelatedDuplicates_thumbs();
printRelatedLabels_thumbs();
</script>
</div><div style='clear:both'/>
</b:if>
<!-- Related Posts with Thumbnails Code End-->
Note: You can change 5 , Related Posts as your choice.
7.Now save your template and you are done.

How To Add Automatically Link To This Post Widget To Blogger

3 comments
Do you like to add "Link To This Post Widget" under your blog post?This will help you to increase your site's backlinks for better SEO.So if you interested to add this useful widget to your blogspot blog follow the simple steps below.
1.Log in to your dashboard--> layout- -> Edit HTML
2.Click on "Expand Widget Templates"
3.Scroll down to where you see this:
Link to this post widget for blogger
<data:post.body/>
  4.Copy below code and paste it immediately after the line <data:post.body/> .
<div style='border: 0px solid #646464; padding: 2px 2px; margin:2px 2px;background-color:#ffffff;font-size:11px;'>
<p>If you like this please Link Back to this article...</p>
<textarea cols='60' id='bloglinking' name='bloglinking' onclick='this.focus();this.select()' onfocus='this.select()' onmouseover='this.focus()' readonly='readonly' rows='2'>&lt;a href=&quot;<data:post.url/>&quot;&gt;<data:post.title/>&lt;/a&gt;</textarea><br/>
</div><br/>
Note:You can change colors,font,... if you like.
5.Click on "Save Templates" and now you are done.

Monday, March 4, 2013

How to Add or Remove Featured Article Slider in blogger themes?

7 comments
Most of us are using the blogger as platform to share your knowledge with others or earning some serious money with your knowledge. There are many in-build basic as well as modern templates in blogger but most often we use themes created by artists other than blogger. These artists make there themes more user friendly and stylish according to web 2.0. Many times in these themes we see a "Featured Article" name slider in the top most portion of posts section which specify the top most viewed post of your blog, but in some cases we don't want these slider in our blog and try to remove them. But as we all are not web designer and we don't know how to edit the HTML so these slider become a problem to us.


Step 1.
Go to your blogger account click on Template and Download your full template so as to make a backup. Then click on Edit Templates.

Step 2.
Start from the bottom n keep on looking the coding like this...


<!-- Featured Content Slider Started -->

<b:if cond='data:blog.pageType != &quot;static_page&quot;'>
<b:if cond='data:blog.pageType != &quot;item&quot;'>


<div class='featuredposts clearfix'>

<div class='fp-slides'>

<div class='fp-post'>
<div class='fp-thumbnail'><a href='featured-post-1-url-here'><img src='http://3.bp.blogspot.com/-viGE-reitBQ/TibVaXQyoMI/AAAAAAAAC1U/Vd8nXsp207E/s000/1.jpg'/></a></div>
<h3 class='fp-title'><a href='featured-post-1-url-here'>This is default featured post 1 title</a></h3>
<p>Go to Blogger edit html and find these sentences.Now replace these sentences with your own descriptions.PageList1</p>
</div>

<div class='fp-post'>
<div class='fp-thumbnail'><a href='featured-post-2-url-here'><img src='http://3.bp.blogspot.com/-yC2ItwN5lVg/TibVasa4PBI/AAAAAAAAC1Y/T-MusfHMvSM/s000/2.jpg'/></a></div>
<h3 class='fp-title'><a href='featured-post-2-url-here'>This is default featured post 2 title</a></h3>
<p>Go to Blogger edit html and find these sentences.Now replace these sentences with your own descriptions.PageList1</p>
</div>

<div class='fp-post'>
<div class='fp-thumbnail'><a href='featured-post-3-url-here'><img src='http://4.bp.blogspot.com/-SVxu3sQIBRI/TibVa6VtpMI/AAAAAAAAC1c/-A6Gjd7d4z0/s000/3.jpg'/></a></div>
<h3 class='fp-title'><a href='featured-post-3-url-here'>This is default featured post 3 title</a></h3>
<p>Go to Blogger edit html and find these sentences.Now replace these sentences with your own descriptions.PageList1</p>
</div>

<div class='fp-post'>
<div class='fp-thumbnail'><a href='featured-post-4-url-here'><img src='http://2.bp.blogspot.com/-g8Og-gFETa4/TibVbOrq1tI/AAAAAAAAC1g/815xr1cXIMA/s000/4.jpg'/></a></div>
<h3 class='fp-title'><a href='featured-post-4-url-here'>This is default featured post 4 title</a></h3>
<p>Go to Blogger edit html and find these sentences.Now replace these sentences with your own descriptions.PageList1</p>
</div>

<div class='fp-post'>
<div class='fp-thumbnail'><a href='featured-post-5-url-here'><img src='http://2.bp.blogspot.com/-p47uhAxrirI/TibVbuDPhwI/AAAAAAAAC1k/zLcwjH0017o/s000/5.jpg'/></a></div>
<h3 class='fp-title'><a href='featured-post-5-url-here'>This is default featured post 5 title</a></h3>
<p>Go to Blogger edit html and find these sentences.Now replace these sentences with your own descriptions.PageList1</p>
</div>

</div>


<div class='fp-nav clearfix'>
<span class='fp-pager'/>
<a class='fp-next' href='#fp-next'/>
<a class='fp-prev' href='#fp-prev'/>
</div>
</div>


</b:if></b:if>

<!-- Featured Content Slider End -->
Content Slider End --&amp;amp;gt;
Step 3.
Select all these coding(or similar to it) and just delete it or edit it to customize your slider. And if you remove it then your blog will look like this


Step 4.
First click on Preview to verify your editing and if you are totally satisfied click on Save Template.

How to Change Blogger Template in New Blogger Interface

1 comments
Some might use blogger old interface. But the old blogger interface will not be available in future. That means old interface retires.
So I write about ‘How to Change Blogger Template in New Blogger Interface’. Below are the step by step procedures to change the blogger template.
1. First download a new blogger template. Lots of templates are available in internet for free. Search for free blogger templates. Download a template which you want. The blogger template you downloaded will be an xml file or text file.
2. Login to blogger.You will get your list of blogs
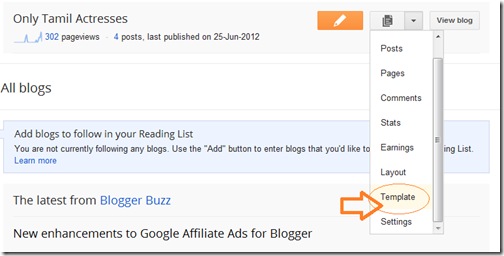
3. Then go to ‘template’ section as given in below image.
Blogger-Template-Changing
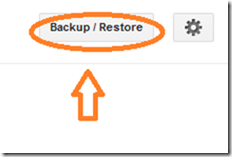
4. Then click ‘Backup/restore’ button which will be at the right top corner.
blogger-backup and restore
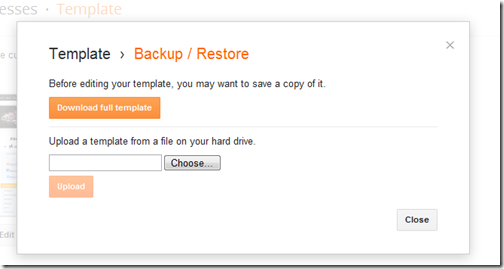
5. A lightbox window will open with two options. First one ‘download full template’ is for making a backup of current template and second one ‘upload’ is for choosing a template from your computer and upload it to change the blogger theme.
If you want, you can take backup.
To change the template first click ‘choose’ and browse for the template you download and then click ‘upload’.
blogger-template-upload
That’s all. Your template will be changed.
6. If you want to edit the template you uploaded click ‘edit html’ button.
Blogger-edit-html
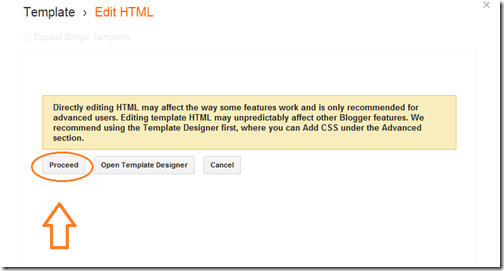
A lightbox window will open and alert you. Click ‘proceed’ button.
blogger-edit-html-proceed
7. After clicking ‘proceed’ button you can see the html code of your new blog template. Check the ‘expand widget templates’ option. blogger-expand-widget
8. Edit styles of widgets, body, text etc., And click ‘save template’ button.
blogger-save-template
Then click ‘close’ icon.
9. If you want to add gadgets, go to ‘layout’ option.
blogger-layout
10. Click ‘add a gadget’ to add a gadget from a list of available gadgets. Arrange them by drag and drop. Don’t forget to save the changes by clicking ‘save arrangement’. blooger-add-gadgets
That’s all. View your blog to see the changes.

One important thing to do:

One thing you must do is backup your blog html gadgets you added in old template and delete them before uploading your new template. After changing template restore them.
Why?
If you don’t delete them, those html codes may be hidden or vanished from your template ( I don’t know why. But sometimes it happens). But they may run. You can’t stop them working. I personally experienced it. I had a blog. Also I had added a gadget having a code for pop-up advertisements.
When I uploaded the template that html code gadget was vanished. I could not find it. But the advertisements had been showing on my blog. Later I realized pop-up adverts are irritating adverts. Also that advertising network suspended my account. But I could not remove their code from my blog since I could not find it. Adverts had been showing on my blog. So I deleted that blog and started this blog.
The problem with template Uploader may not come or template Uploader may not create the problem. But for safer side backup your gadgets codes, delete and restore after changing your template.

Followers

Blogumulus by Roy Tanck and Amanda Fazani
Free Blogger Tips, Hacks, Widgets, Templates and more