


For many bloggers, checking blog traffic can be such a routine activity that consumes lots of their times, well, it happens to me also, and a lot. Every single day, when i woke up in the morning, i just couldn't help myself to start opening the Sitemeter (site traffic analyzer) just to check how many visitors that have visited my blog from 0 am until 6 am. I know that can be a little bit wacko for some of you who are not a blogger, but as a blogger, analyzing blog traffic will always be on the top of our to-do list, even if we don't have a to-do list.
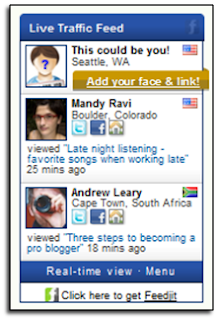
Anyway, finding information about who have been visiting our blog can also hold the important role in analyzing our blog traffic more thoroughly. Well, that's because, by knowing about all the data, such as visitor jumping pages, entering pages, browsing length, region/area where visitors came from, and other important data that can help us in improving our blog traffic even better in the future.
1. Go to FeedJit website
Firstly, now head on to
FeedJit website to start getting this widget.
2. Sign up to FeedJit
As soon as you get to that website, now scroll the page down and find the link called "Click here to sign up for Feedjit Pro....".
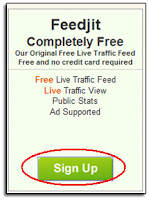
3. Choose your FeedJit account
In the new page, you will be provided with 3 choices of FeedJit account, such as: Feedjit
Completely Free, Feedjit Advanced, and Feedjit Pro. I suggest you to pick the first option, FeedJit Completely Free account because it's free to use without splashing our cash.
4. Customize the appearance of the widget
After choosing your FeedJit account, you will be brought to the new page regarding the configuration of your widget. In this page, you can set up your widget that suits to your preferences, such as customizing the colour of your widget, setting up the number of visitors in the widget and visitors jumping page, and other stuff.
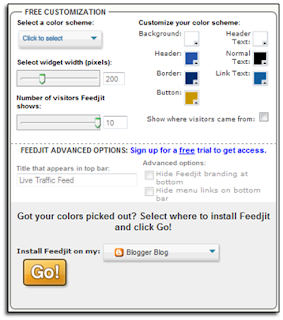
5. Press the "Go" button
Okay, after finished setting up your widget, now press the button "Go" and don't forget to pick your blog platform (Blogger, Wordpress, Typepad, etc) before leaving this page.
6. Install the widget into your blog
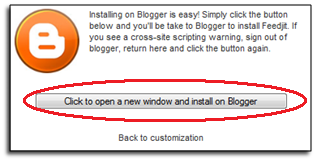
In the new page, you will be prompted with the option to start adding the FeedJit widget into your blog, or go back to the customization page. To install the widget, now press the button "Click to open a new window and install on Blogger".
7. Install the widget in your blog layout
As soon as you press the "Click to open a new window and install on Blogger" button, you will be automatically directed into your blog layout or Page Element mode. Now pick the best location for the FeedJit widget in your blog layout, and then press the Save button.
In your blog, you will see that FeedJit widget has been successfully added in your blog. From now on. you can feel relief to check your blog traffic directly from your blog.
Okay, that's it for now. Stick to this blog to get more widgets coming up.


0 comments:
Post a Comment