Saturday, December 18, 2010

Blogger/BlogSpot Pagination (Page Navigation) Made Easy

7 comments
Pagination In Blogger/BlogSpot Blogs:


LIVE DEMO (see page bottom)

Read this tutorial to add Pagination to any BlogSpot / Blogger based blog with just two steps. The pagination numbers are completely customizable.

Instructions to follow:

STEP #1:

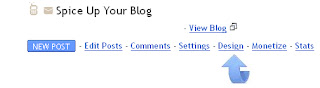
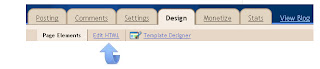
Log in to Blogger, go to Layout -> Edit HTML

Find this code:
</body>

And paste this code immediately ABOVE/BEFORE it:
<!--PAGINATION-STARTS-->
<script type='text/javascript'>
var pageCount=10;
var displayPageNum=3;
var upPageWord =&#39;Previous&#39;;
var downPageWord =&#39;Next&#39;;
</script>
<script src='http://files.main.bloggerstop.net/uploads/3/0/2/5/3025338/pagination1.js' type='text/javascript'/>
<script src='http://files.main.bloggerstop.net/uploads/3/0/2/5/3025338/pagination2.js' type='text/javascript'/>
<!--PAGINATION-STOPS-->

var pageCount=10; is the number of posts to be displayed on each page. [For ex. in a simple Google search on each page you are shown 10 search results] - change the number "10" to any number you want.

var displayPageNum=3; is the number of buttons to be shown (on each side) along with the page number currently seleted.
For eg. If a reader is on page 6, then in the pagination, page numbers will be displayed like this:

Prev 3 4 5 6 7 8 9 Next

i.e. 3 page numbers on each side of number 6.

STEP #2
Now we'll do the styling of these pagination numbers...
By default, this code will give a purple look to the numbers.

Find this code in the template:
</head>

And immediately ABOVE/BEFORE it, paste this code:
<!--PAGINATION-STARTS-->
<link href='http://files.main.bloggerstop.net/uploads/3/0/2/5/3025338/pagination2.css' rel='stylesheet' type='text/css'/>
<style type='text/css'>
.showpage a:hover {
color: #FFFFFF;
background-color: #92416C;
}
// STYLE CODE FOR SELECTED PAGE STARTS
.showpagePoint {
color: #FFFFFF;
background: #92416C;
border: 1px solid #92416C;
}
// STYLE CODE FOR NUMBER BUTTONS STARTS
.showpageNum a:link,.showpage a:link {
color: #000000 !important;
background-color: #92416C;
border: 1px solid #92416C;
}
// HOVER CODE for NUMBER BUTTONS
.showpageNum a:hover {
color: #FFFFFF !important;
background: #92416C !important;
border: 1px solid #92416C;
}
// STYLE CODE FOR "PREV and NEXT" BUTTONS STARTS
.showpageArea a {
border: 1px solid #92416C;
}
// HOVER CODE for NEXT-PREV BUTTONS
.showpageArea a:hover {
border: 1px solid #92416C;
color: #FFFFFF !important;
background: #92416C !important;
}
</style>
<!--PAGINATION-STOPS-http://bloggerstop.net-->

In the code above, everywhere #92416C refers to purple color.
Replace it with the color codes you want [view color-combinations and get HTML hex-color codes from this page].
Try different colors for borders, backgrounds, hover effects, and the numbers text too, according to the instructions I have highlighted in RED/BLUE colors.

Some Popular Blogger-Pagination Examples...


NOTE: If you create something unique and it can be modified more to suit other tempates, then do comment on this page and show your work. Your blog will be featured in this post.

Save the template.

STEP #3

Download and save the files used in this tutorial as a backup on your PC [Download Link]

Friday, December 17, 2010

Majestic

0 comments

Majestic is cute Blogger templates requested by DesiMasthi which I converted on Blogger platform. Recommended for personal and business blogs.

Features: 3 columns, right and left sidebar, dark, minimal, top menu links, simple, business

Nice 3 column Blogger Template "Clean Dark" download

0 comments
Download 3 Column nice Blogger Template "Clean Dark":

As I promised before to design more and more templates for you guys,.. here is my latest entry "Clean Dark". The design looks very professional with three columns and stylish easy navigation bar at the top.
This was originally a wordpress theme designed by some unknown guy.... I found this theme yesterday when I was searching for some good wp themes.. and this one seems good looking for me and I converted it to Blogger xml format.. I searched for the theme creator but I didn't got any information.. Ok .. anyways thanks to him.


Clean Dark template screenshot


Template Installation Instructions:


[First backup your present Blogger Template before uploading any Blogger template]

After downloading the template, unzip it and next sign in to blogger dashboard »» Layout »» Edit html
and upload the xml file using the browse button and Save the Changes.

Next, you can change the navigation links to your desired ones..

Edit the top navigation links to yoursJust Scroll down the template code and find this below piece of code and simply change the links and anchor text.


Hope you like it!

Professional Magazine style Blogger Template 'FunkyZine'

0 comments
Download Excellent,Professional Magazine style Blogger Template 'FunkyZine':

FunkyZine is a magazine style with stylish background,3 column, widget ready Blogger Template.
This was originally a Wordpress theme designed by ChiQ of wpthemedesigner.com
and I converted it into Blogger xml format for you guys!


Template installation help:

If you are a newbie, first install the template using the instructions here.
After installing the template successfully, you have to do a few things..

1. A *psd file of the header logo is packed with the template download file, open it with Photoshop and edit the logo text to your Blog name.

Once you completed editing it, save the file as *jpeg format and upload the image to any image hosting service like photobucket and copy the direct link to that image.

Next, go to Template »» Edit html and find this url


and change this above url in the template code with the one you just copied.


2.Edit the top navigation links.

Find this code and change the anchor text (Home,About,Pictures,etc) and write the respective links by replacing the YOUR-LINK-HERE


3.And the final thing to do is to edit the feedburner url's.


Find this code and enter the respective links.


and Save the Changes.
Hope you guys like the template!

Thursday, December 16, 2010

How to Create Google Adsense Account

0 comments
Today Google Adsense is the most popular online money maker for website and blog owner. But many blog owners do not know how to create Adsense account. Actually create an Adsense account is very easy, you just require a website or blog with language content that supported by Google Adsense and the website has indexed by Google (suggestion: the website contain minimal 10 pages to get Adsense accepted).
Some important aspects to success creating Google Adsense account you must have a website with self hosting (now Google not accept free domain such as BlogSpot, multiply, and other free domain) and your website not contain content that violates Adsense content guidelines such as Pornography content, hacking or cracking, Gambling, Illicit drugs and other.
Are you ready to create Google Adsense Account? Please the following steps to create an account:
  1. Open Adsense website at this link: https://www.google.com/adsense. After the Adsense page opened click “Sign up now” button.
    1 create adsense account
  2. On the next page you must completed the Adsense registration form.  There three form sections must be completed on this page, here:Website information; enter you website URL, website language (Now Adsense support 32 language)
    2 create adsense account Contact Information; Select your account type and Enter the valid information on the form (payee name, address, phone). This data be used to received when you received your payment.
    3 create adsense account
    Policies; you must agree all Adsense policy. Check all option on this section.
    4 create adsense account
    After all data complete click “Submit Information” button
  3. After submit the form Google will review your website and your registration. Usually it needs 1 to 5 days to get your Adsense registration approved or rejected.  Google will send an email to your inbox if your Adsense approved or rejected.

Pro Magazine World’s First Premium Blogger Template With Lot Of Features

0 comments
After a long time hard work, I make a premium magazine blogger template which has a lot of features already enabled in it. I think this is first blogger template which has so much features like social bookmarking widgets, related post under every post, feedburner email subscriber, translate webpage into many languages widget, tweetme button on every post, page navigation with page numbers, 4 ads right side and a banner at the top, WordPress type comment box already enabled in it, check on many borwser. I think this is awesome template that I make for my blogger community. It is free to use for all but not change credits at the bottom. This is perfect business template for your blog. You never see this kind of premium blogger template as free of cost.
Features:
  • Ads Supported
  • Tweetme Button
  • Social Bookmarking
  • Compatible with All Browser
  • Premium Blogger Template
  • WordPress Like Commenting Box
  • Email Subscriber
  • Language Translator
  • Page Navigation With Numbers
  • Related Post Under Every Post
promagazine Pro Magazine Worlds First Premium Blogger Template With Lot Of Features
Please Give Some Comments here about this template. Thanks

One more Magazine style Blogger Template "SchemerMag"

0 comments
Releasing SchemerMag Magazine style 3 Column Blogger Template:
As usual, this is a wordpress to blogger conversion.. wp theme by Chiq Montes of wpthemedesigner.com and converted to Blogger by me.

look at the screenshot:

SchemerMag blogger template screenshot

Special Features:
» Thumbnails on articles (automatic resize)
» Google Adsense/banner ready
» 3 Columns
» SEO Optimized
» Featured video
» Read more..(automatic summarize)


Step by Step Installation guide:

Step 0: First , follow the basic installation steps here.

Step 1 : Editing top Navigation links
1.a :

editing links 1
Go to Layout » Edit html and find this code


<li><a expr:href='data:blog.homepageUrl'>Home</a></li>

<li><a href='http://bloggertricks.com'>Blogger Templates</a></li>

<li><a href='http://blogger.com'>Blogger</a></li>

<li><a href='http://bloggertricks.com'>Blog Tips</a></li>


and Replace the Anchor text (Blogger Templates,Blogger,Blogtips) and their respective links to your needs.

1.b:

editing nav links 2
and again, there's another navigation bar..
Find this code


<li class='f'><a href='http://google.com'>Google</a></li>

<li><a href='http://bloggertricks.com'>Blogger Templates</a></li>

<li><a href='http://gmail.com'>Gmail</a></li>

<li><a href='http://bloggertricks.com'>Blogging Tips</a></li>

<li><a href='http://blogger.com'>Blogger</a></li>

<li><a href='http://adsense.com'>Adsense</a></li>


and edit the anchor texts,links as you wish.

Step 2: Adding Adsense banners to header and on top of every post

2.a: Adsense on header

Adsense on headerJust go to Layout and edit the gadget as shown below and paste your adsense code (468 x 60px) and save it..

edit the gadget for adsense banner on header

2.b: Adsense on above first post (even on labels,search pages)

editing ad
Just go to Layout page and edit the 'advertisement' gadget as shown below

edit this

Step 2 : Edit the logo text

edit the header
The .psd file is included in the template download file. Just open it with photoshop and edit the text and save it as image file (.jpg or .gif). Next , upload to any image hosting servies and copy the image url of the uploaded image.
Next, go to Edit html and replace this image url in the template with the one you just copied now.

http://i43.tinypic.com/er0iyo.jpg

Under The Clouds - Personal Blogger Template

0 comments
Best Personal Blogger Templates


Template DemoTemplate Download

Excellent Tabbed Sidebar Gadget Section For Blogger

0 comments


The Tabbed Sidebar Section is another very popular and very practical feature we see on most of the best Blogs.A tabbed sidebar section is an area on your sidebar with usually three (But can be more) headings readers can toggle through.On most blogs (Including this one) this section will contain a list of Popular Posts, Recent Posts, And Labels, although some blogs use the third section for recent comments.On your blog you can add any gadgets you like to the Tabb's.

Live Demo - At the time of writing i have the Tabbed Sidebar Section here on Spice Up Your Blog.You can also see a version on Social Icon Studio.

ScreenShot

tabbed sidebar section for blogger

The Tabbed section i will help you add to your blog in this post is by far the best available for Blogger.It comes thanks to Abu Farhan and is much more customizable than any other.The new best option in this tabbed gadget is the ability to place it anywhere down your sidebar, previous tabbed gadgets for Blogger had to be at the very top or bottom.Depending On the width of your sidebar you can have as many tabs in the section as you like.

While adding the code to your template is quiet simple there are some settings at the end that can be confusing, So make sure to Back up your template.

Add Tabbed Sidebar Section To Blogger

Step 1. In your dashboard click 'Design' > 'Edit Html'


Step 2. Find the following piece of code in your blogs Html : (Click Ctrl and F for a search bar to help find the code -
]]></b:skin>

Step 3. Copy and paste the following code Directly Above / Before ]]></b:skin>

/* Tabbed Sidebar Widgets http://blogwidgetbox.blogspot.com/
--------------------------------- */
.widget-wrapper2{
border:1px solid #494e52;
background-color:#636d76;
padding:8px;
}

.widget-tab {
-moz-border-radius-bottomleft:5px;
-moz-border-radius-bottomright:5px;
-moz-border-radius-topright:5px;
-webkit-border-radius-bottomleft:5px;
-webkit-border-radius-bottomright:5px;
-webkit-border-radius-topright:5px;
background:#FFFFFF url(http://i195.photobucket.com/albums/z105/dantearaujo/tabcontentbg.gif) repeat-x scroll left bottom !important;
border:1px solid #CFCFCF;
font-family:Arial,Helvetica,sans-serif;
padding:15px !important;
}

.widget-tab ul {
margin:0px;
padding:0px 20px 0px 20px;
}
.widget-tab ul li {
list-style:none;
border-bottom:1px solid #d6dde0;
padding-top:10px;
padding-bottom:10px;
font-size:13px;
}
.widget-tab ul li:last-child {
border-bottom:none;
}
.widget-tab ul li a {
text-decoration:none;
color:#3e4346;
}
.widget-tab ul li a small {
color:#8b959c;
font-size:9px;
text-transform:uppercase;
font-family:Verdana, Arial, Helvetica, sans-serif;
position:relative;
left:4px;
top:0px;
}
.tab-content ul li a:hover {
color:#a59c83;
}
.tab-content ul li a:hover small {
color:#baae8e;
}

.active-tab{
background:#FFFFFF url(http://i195.photobucket.com/albums/z105/dantearaujo/tabtopbg.gif) repeat-x scroll left top !important;
border-color:#CFCFCF #CFCFCF #FFFFFF #CFCFCF !important;
border-style:solid !important;
border-width:1px 1px 2px !important;
color:#282E32 !important;

}

ul.tab-wrapper {
margin:0px; padding:0px;
margin-top:5px;
margin-bottom:6px;
}
ul.tab-wrapper li {
-webkit-border-radius-topleft:5px;
-webkit-border-radius-topright:5px;
-moz-border-radius-topleft:5px;
-moz-border-radius-topright:5px;
background:#191919 url(http://i195.photobucket.com/albums/z105/dantearaujo/tabinactivebg.gif) repeat-x scroll left top;
border:1px solid #464C54;
color:#FFFFFF;
cursor:pointer;
display:inline;
font-family:Verdana,Arial,Helvetica,sans-serif;
font-size:9px;
font-weight:bold;
line-height:2em;
list-style-image:none !important;
list-style-position:outside !important;
list-style-type:none !important;
margin-right:1px;
padding:8px 14px;
text-align:center;
text-decoration:none;
text-transform:uppercase;
}

Note - That code sets the fonts, colors etc.. and can be changed.

Step 3. Find the following piece of code in your blogs Html : (Click Ctrl and F for a search bar to help find the code -
</head>

Step 4 Copy And Paste The Following Code Directly Above / Before </head>

<!-- jQuery Call -->

<script src='http://ajax.googleapis.com/ajax/libs/jquery/1.2.6/jquery.min.js' type='text/javascript'/>

<!-- End of jQuery Call -->

<script type="text/javascript">
var starttab=0;
var endtab=2;
var sidebarname="sidebar1";
</script>
<script type="text/javascript" src="http://scriptabufarhan.googlecode.com/svn/trunk/bloggertabv1.0-min.js"></script>

You must now set up this final section of code to suit your blog.

Note 1.  sidebarname='sidebar1'<--With all the custom templates for blogger many of the templates use different names to define the sidebar.This must be set to the name used in your template.Here is how to find the name of your sidebar : In your dashboard click 'Design' > 'Edit Html' > Now search for the following :

<div id='sidebar-wrapper'>

Below this you will see something similar to this :

<b:section class='sidebar' id='sidebar1' preferred='yes'>

This example tells you the sidebar name is simply sidebar1 if this is the case in your template your ready to go and don't need to change anything.But it may be different on in your template, in my template it's called topsidebar.If it's different in your template replace sidebar1 with the name.

OK you now have a tabbed sidebar section that will be at the top of your sidebar with three gadgets.The section uses the top three gadgets currently in your sidebar so you can drag and drop the gadgets you want displayed into place.

Move The Tabs Section Down Your Sidebar And Add More Tabs

As i said at the start of the post you can have the tabbed section start anywhere in your sidebar and you can have more than 3 gadgets.The set up for this is straight forward but it's quiet hard to explain.In the last section of code you added in Step 4 there are two more settings Highlighted and changing these settings will determine  were the Tabbed section starts and how many gadgets are included.

starttab=0 <--This sets were the tabbed section will start.If you leave it at 0 the tabbed section will start at the very top of your sidebar, if you change it to 1 there will be 1 regular gadget then the tabbed section then the rest of your gadgets and so on.

endtab=2 <--This sets were the tabbed section ends or how many gadgets will be in the tabbed section.If you change the starttab to 2 you must also add 2 to this and make it 4 and so on.If you have the starttab=1 and endtab=4 you will have 5 gadgets in the section.

Note - The width of your sidebar will restrict how many gadgets you can add to the tabbed section also you must keep the titles of the gadgets short so the will fit.You must give the gadgets in the Tabbed section a Title.

OK i have already added this to 5 blogs and I'm confused just telling you guys how it's done hehe.Take your time and you will figure it out and it's worth the effort.If you simply cant figure out the settings just drop a comment below with were you want the sidebar to start and how many gadgets you want displayed and i will let you know what to change.

That's your tabbed sidebar section for Blogger, make sure to check out more of the awesome Gadgets and Design tips we have for your blog.

Finally Open Google Custom Search Results In Blogger Blogs

0 comments

open custom search results blogger The Google custom search bar returns in my opinion the most accurate results for your blog.The search bar itself is compact and stylish and can be easily added to your blog.For those of you not familiar with the Google Custom search bar it basically looks the same as the search on the Google home page and when added to your blog returns results in the same format.The big difference is the results returned are All posts on Your Blog.This is a great way to let the readers of your blog quickly find exactly what they are looking for.The Google custom search bar has been vastly improved over the years and is still constantly getting better but i have always had one Big Issue with using Google Custom search on my Blogger blogs.

One of the great options you are offered when setting up a Google custom search box for your blog is to open the results within your site or blog.So instead of readers leaving your blog and going to a separate Google page to see the results of their search they will see the results on a page that is actually part of your blog.This has a number of benefits here are three of the main ones :

- It's never good to send readers away from your blog and the separate Google page does not have a direct link back to your homepage.
- As they stay in your blog it increases your views and the search results page will be crawled by Google helping SEO.
- Displaying the results within your blog looks much more professional.

That's Fantastic but because of the minimum requirements set by Google such as minimum width of search results pages Blogger users cant actually choose the option to display the Search results on within their blog...Until Now !

In this post i will show you how you can create a totally unique page on your blog and display the results from Google Custom search on that page.

Demo 1 - Go to our demo blog and use the search bar in the header to see the results page :

Demo Click Here

Cool Eh ? - But that's just a plain page, take a look at how you can customize the page :

Extra Cool eh ? - You can see more results by using any of the search bars on this blog.

There are a number of step involved to get your search bar and search results page.

- You need to create a new Google custom search bar for your blog.Only AdSense members have the option to Embed results in their Blog if you have not yet joined AdSense apply here - Google AdSense.

- You need to create the page for the results and add code to your template to customize the page.

Don't worry i will walk you through all the steps.So lets get stared, make sure to back up your template and take your time.

Open Google Custom Search Results In Your Blog

Create The Page For The Google Search Results

Step 1. First we will create the page that displays your search results.From your Blogger dashboard click 'New Post' or 'Edit Posts' > and in the top menu click 'Edit Pages' > Now Click 'New Page'.


Step 2. Add A Title Like 'Search Results' to your page but leave the actual content area totally blank and publish the page.You will now be asked how you would like the page to appear choose 'No Gadget - Link To Pages Manually' and publish.OK you will now be presented with the option to view the page, click that link.

Step 3. For the next step we need the URL of the blank page you just created so copy the URL from the address bar and keep it or you can go back for it when needed.

That's the first part covered We will Create the search bar In your AdSense account.

Get The Search Bar Code From AdSense

Many of you will have created an AdSense custom search bar previously and it's a fairly straight forward process, this time we just have to chose to use the 'Open Results In My Own Site' Option.Lets have a look :

1. Log Into AdSense

2. Click the 'Get Ads' option the the top menu > Tick 'AdSense For Search' and continue.

3. AdSense walk you through the steps of creating the Search Bar:

- In the third page you will see the 'Opening of search results page' section > Choose 'Open Results In My Own Site.

- Below this is 'Enter URL where search results will be displayed' > Enter the URL of the page you created above and just leave the width at 800px then scroll down.

- You will be asked to choose the style of the search results page > I have set up the page to work with the default pallet so leave this and move on.

- The next page requires you to accept the AdSense Terms and name your search bar (The name of the bar is only to help locate it in your AdSense account and is not important).Click 'Submit and get Code'.

- Usually you would now be presented with one snippet of code for the search bar this time you will get two.The first snippet is for the search bar and the second is for the search results page.Save both pieces of code or keep the page open as you will need both later.

OK back to your Blogger Dashboard (Are you keeping up)

Add The Search Page Code To Your Template

Step 1. In your dashboard click 'Design' > 'Edit Html'


Step 2. Find the following piece of code in your blogs Html :
(Click Ctrl and F for a search bar to help find the code - 
</body>

Step 3. Copy and paste the following code Directly Below / Under </body>

</b:if >

Step 4. Don't save you template we have the final step to complete - Find the following piece of code in your blogs Html :
(Click Ctrl and F for a search bar to help find the code -
</head>

Step 5. Replace </head> with the code below :

<!--search page code by www.spiceupyourblog.com-->
<b:if cond='data:blog.url == &quot;URL-OF-YOUR-PAGE&quot;'>
<style>
body{
margin:0;
padding:0;
background:#ffffff;
font:70% Arial, Helvetica, sans-serif;
color:#555;
line-height:150%;
text-align:left;
}
#container{
margin:20px auto;
width:850px;
background:#fff;
padding-bottom:20px;
border-left:1px solid #bebebe;
border-right:1px solid #bebebe;
}
#content{
margin:0 20px;
}
h1 {
background:none repeat scroll 0 0 #DDDDDD;
font-family:sans-serif;
font-size:27px;
font-style:italic;
font-weight:lighter;
text-align:center;
text-shadow:1px 0 0 #FFFFFF;
margin:0px;
}
p{
margin-bottom:18px;
font-style:italic;
font-family:Georgia, Times, serif;
font-size:24px;
color:#bfe1f1;
padding:0;
}
a {
text-decoration:none;
}
ul {
margin:0px;
padding:0px;
}
ul li {
border-left:1px solid #000000;
color:#BEBEBE;
font-family:Arial;
font-size:13px;
font-style:italic;
list-style:decimal inside url(&quot;https://blogger.googleusercontent.com/img/b/R29vZ2xl/AVvXsEjiwIBd07S7xDeAXWrZY0hGo4kBfB3SYZbYO1nBKmo10D5b86g4IBC-kJi3djjYeyO_SNG469TeRGPTT60Y6oD8EV00HFB7lLKur2go0SsL9ciR3wlicwA17NIoyYf_XIqVkdiQJnWI15_8/&quot;);
margin:0 0 0 15px;
padding:8px 8px 8px 0;
}
li a{
text-decoration:none;
color:#057fac;
display:block;
margin-top:-12px;
padding:0 0 0 30px;

}
li a:hover{
text-decoration:none;
color:#999;
}
</style>
<!--[if IE 6]>
<style>
li a{
display:inline-block;
padding:0 0 0 5px;
margin-top:-10px;
}
</style>
<![endif]-->
</b:if>
</head>
<b:if cond='data:blog.url == &quot;URL-OF-YOUR-PAGE&quot;'>
<body>
<div id='container'>
<h1>YOUR-BLOGS-TITLE</h1>
<div id='content'>
<table border='0'><tr><td><a href='URL-OF-YOUR-HOME-PAGE'><img src='https://blogger.googleusercontent.com/img/b/R29vZ2xl/AVvXsEgkSk8SnKOlHUpcl8cAQvvHLn0BiGUUrmq4UtBp5aGmiVXoRR_cOCsOHyh-nDk0HpaGmrAaBf9Du43T4HC7PIoIOtlU62Fzp-QxqRGaex3WIJP5bQhsK5M8l0zkDpqcSJXs2dmEQAxAc9UU/s1600/ico-home.png'/></a></td><td><a href='URL-OF-YOUR-HOME-PAGE'>Home Page</a></td></tr></table>

<!--REPLACE THIS WITH THE SEARCH RESULTS CODE-->

<a href="http://www.spiceupyourblog"><small>Results Page From
Spice Up Your Blog</small></a>
</div>
</div>
</body>
<b:else/>

<!--end search page code by www.spiceupyourbog.com-->

Important - We now need to add a few things to the code.

1.Where you see URL-OF-YOUR-PAGE( Twice)  in red - Replace with the URL of the blank page you created in step 1.

2. Where You See YOUR-BLOGS-TITLE in blue - Replace with the title of your blog (You could also use 'Search Results' etc..)

3. Where you see URL-OF-YOUR-HOME-PAGE (Twice) - Replace with the URL of your blogs home page.

4. Where you see <!--REPLACE THIS WITH THE SEARCH RESULTS CODE--> - Replace with the second section of code provided by Google AdSense.

Add The Search Bar  - OK if you took your time and sure all the code is in the right place save your template.Now add the code for the actual search bar you your blog > Just head to your Design page > Add A Gadget > Choose Html/Javascript > Paster in your search bar code and save.

That's it go test out your search bar - Very Important - While you can test your new search bar Do Not click the ads on the search results page !

As you have seen by the results page for Spice Up Your Blog you can add lost more customizations to the code.If you need more help drop a comment below.There are a lot of steps involved and it has been a hard tutorial to write but if you take your time I'm sure you will have no problems.

Make sure to check out more Helpful Posts On AdSense and our post showing you how to use the same styling to create a Totally Unique Table Of Content Site Map (Check out my Site map from the top menu for a demo).

Wednesday, December 15, 2010

Add Two Types Of Falling Roses To Your Blog

0 comments


This is a post that was requested by a number or readers and i actually had the code created and ready to go but forgot to publish it ! It wasn't unit i landed on one of my test blog yesterday and was greeted with roses falling down the page that i thought "Oh Yeah The Roses".Anyway after the original Falling Flower Effect Tutorial post from January some of you requested the falling flower effect but with roses.Only 10 months later and here it is, i have two separate Roses you can have floating down your blog.As with the flowers the script is designed to have the roses falling in a manner that will not effect readers.We have a thin rose and stem and we have a full rose, lets take a look at them.

Thin Rose

Thin Rose Live Demo

Full Rose

Full Rose Live Demo

Add Falling Roses To Your Blog

We have two ways to add this to your blog, the first way is the easiest but will not work on blogs using template made with the Blogger Template designer.Basically if your blog has a template created with the Blogger template designer use the second method otherwise use the first.

Add Falling Roses To Custom Or Old Blogger Templates

Step 1. In your dashboard click 'Design' > 'Add A Gadget' > Choose 'Html/Javascript' gadget from the pop up.


Step 2. Copy the code for the rose you want below and paste it into the Htm/Javascript gadget.

Thin Rose Code
<script src="http://spiceupyourblogextras.googlecode.com/files/spiceupyourblogrosethin.js" type="text/javascript">
/***********************************************

* Flower fall effect by Paul Crowe @ http://www.spiceupyourblog.com
* Please keep this notice intact

***********************************************/
</script><a href="http://www.spiceupyourblog.com" target="_blank"><font size="1">Get Flower Effect</font></a>

Full Rose Code
<script src='http://spiceupyourblogextras.googlecode.com/files/spiceupyourblogrosefull.js' type='text/javascript'>
/***********************************************
* Flower fall effect by Paul Crowe http://www.spiceupyourblog.com
***********************************************/
</script><a href='http://www.spiceupyourblog.com' target='_blank'><font size='1'>Blogger Flower Effect</font></a>

Step 3. Save the gadget and check out your Blog with falling roses.

Add Falling Roses To Blogs With Template Designer Templates

Step 1. In Your Blogger Dashboard Click > 'Design' > 'Edit Html'
(You Don't Need To Tick Expand Widget Templates)


Step 2. Find the following piece of code in your blogs Html : (Click Ctrl and F for a search bar to help find the code - 
</body>

Copy the code for the rose you want to use below and paste Directly Above/Before </body>

Thin Rose Code
<script src="http://spiceupyourblogextras.googlecode.com/files/spiceupyourblogrosethin.js" type="text/javascript">
/***********************************************

* Flower fall effect by Paul Crowe @ http://www.spiceupyourblog.com
* Please keep this notice intact

***********************************************/
</script><a href="http://www.spiceupyourblog.com" target="_blank"><font size="1">Get Flower Effect</font></a>

Full Rose Code
<script src='http://spiceupyourblogextras.googlecode.com/files/spiceupyourblogrosefull.js' type='text/javascript'>
/***********************************************
* Flower fall effect by Paul Crowe http://www.spiceupyourblog.com
***********************************************/
</script><a href='http://www.spiceupyourblog.com' target='_blank'><font size='1'>Blogger Flower Effect</font></a>

Step 3 Go check out your blog with Falling roses !

Suggestion - You could add both falling roses to your blog !

Check out more of our cool Blogger Gadgets and Blog Design Tips.

Use A Scrolling Blog Title And Message In Browser Tabs

0 comments


Blogger LED IconThis is a unique Blogger trick you might want to try on your blog.When someone is on your log the name of your blog appears in both the tab section and top of the users browser.In this post i will show you how you can make the title scroll and even add an extra message to scroll across the browser.To do this we add a small piece of code to your template with your blogs title and message.

Live Demo - See The Demo Here

Add Scrolling Effect On Your Blog

Step 1. In your blogger dashboard click > 'Design' > 'Edit Html'


Step 2. Find the following piece of code in your blogs Html :
(It's At The Very Top)

<head>

Step 3. Copy And Paste The Following Code Directly Before / Above <head>

<script type='text/javascript'>
//<![CDATA[
msg = "Name Of Blog Here - Message Here";
msg = " ....." + msg;pos = 0;
function scrollMSG() {
document.title = msg.substring(pos, msg.length) + msg.substring(0, pos); pos++;
if (pos > msg.length) pos = 0
window.setTimeout("scrollMSG()",200);
}
scrollMSG();
//]]>
</script>

Edits

Replace Name Of Blog Here - Message Here with your blogs title and your message.

You can also change the dots in blue with a different symbol, maybe try hearts or music symbols - List Of Symbols.

Once you have made the changes save your template and check it out.Be sure to check out more of our great Blogger Tips and Design Tips.

Create And Add A Second Followers Gadget To Blogger

0 comments


 Share
This is another post that answers a question i was asked by a reader, however this time it was a reader of Best Blogger Templates.On Best Blogger Templates i have a Followers Gadget in the sidebar and a second in the Footer section and a reader wanted to know how i added the second Followers gadget.Many people especially Blogger users like to use the Followers option to keep up to date with their favorite blogs.When you Follow a blog you can see all the updates directly from your Blogger dashboard.So it makes sense to make it as easy as possible for readers on your blog to become followers.To do this most Blogger blogs add the Followers gadget to their sidebar via the 'Add A Gadget' menu in their blogs design page.This is a very easy option but for some reason you are limited to only one followers gadget on your blog and the customize options are very limited.

But the Followers gadget you add via 'Add A Gadget' is just one option, did you know you can create and style a custom Followers gadget and add more than one gadget to your blog ?.The followers gadget you use on Blogger is actually a 'Google Friend Connect' gadget that has been slightly altered for Blogger.In this post i will show you how you can create more Followers Gadgets and fully customize the appearance.By adding a second Followers Gadget to for example your blogs footer you will see an increase in Followers.I will also show you how to add your second Followers gadget in different areas such as below all your blogs posts.The new Followers gadget will have your current Followers displayed and work in the very same way.

Create And Customize Second Followers Gadget


Step 1. First follow this link to the Google Friend Connect  Home Page.

Step 2. If you are not logged into your Google account log in.

Step 3. In the left sidebar you will see a list of your blogs choose the Blog you want the Followers gadget for.

Step 4. You will now see a number of options connected to Google Friend Connect, Click 'Add The Members Gadget'.


Step 5. You are now ready to style your Followers gadget.

Gadget Size

Width - If you intend to use the gadget in your sidebar or footer leave the width as it is.If you want to add the Followers gadget below your posts change it depending on your blogs width, 400 for narrow posting area, 500 for average posting area, 600 for wide posting area (On Spice Up Your Blog i would choose 600).

Rows Of Faces - The rows of face will determine the height of the gadget.

Gadget Style

Choose Colors - You can use any colors to style the Followers gadget and have it blend with your Blogs Template.The easiest way to blend the gadget is by setting all the backgrounds and borders to Transparent.To do this leave the hex color section empty (The hex section is the six numbers that define the color).


Generate Code - Once you are happy with your Followers gadget design scroll down and click Generate Code.

Add Your Second Followers Gadget To Your Blog


Add To Sidebar Or Other Gadget Sections.

Step 1. In your Blogger dashboard click Design > Add A Gadget > Choose Html/Javascript from the pop up menu.


Step 2. Paste the code for your Followers gadget into the Html/Javascript Gadget and save.You can now return to the Design page of your blog and Drag and Drop the gadget into position.

Add Followers Gadget Below All Posts

Step 1. In your Blogger Dashboard click Design > Edit Html > Expand Widget Templates


Step 2. Find the following piece of code in your blogs Html : (Click Ctrl and F for a search bar to help find the code - More Info)

<data:post.body/>

Step 3. Paste the code for your Followers Gadget directly Below / Under <data:post.body/>

Step 4. Save your template.

That's it check out your second followers gadget.If you have more than one Blog you could place Followers options for each blog on the other blog.Check out more of our Awesome Blog Gadgets and Design Tips.

Fixed Merry Christmas Corner Banner For Blogger

0 comments

We are nicely into December now and it's time for another gadget to add some Christmas Cheer to your blog.In this post i have a stylish Merry Christmas Banner you can fix in the top right corner of your blog to greet your readers.The banner is transparent so it wont block your content and as the reader scrolls the banner followers them.A great simple way to wish your readers a Happy Christmas lets look at the demo and then add it to your blog.

Live Demo - Click to see the demo (Scroll The Page): Fixed Christmas Banner Demo

The tutorial is simple and as you just add the code to a gadget you can easily remove it after Christmas.

Add Christmas Banner To Your Blog


Step 1. In your Blogger dashboard click > Design > Add A Gadget > Choose 'Html/Javascript' :

Step 2. Copy and paste the following code into the Html/Javascript gadget :

<div style='position: fixed; top: 0%; right: 0%;'/>
<a href="http://www.spiceupyourblog.com" target="_blank"><img alt="Blog Tips" src="https://blogger.googleusercontent.com/img/b/R29vZ2xl/AVvXsEiNlUJlDKLfrSqv-VsK_bFRFRA3Fmwsmv8C55H_XRWUOj7wVLFiNR9oXxd-FwEhfqvhbIijrAITecbGpCq4oBnr1R3tSDEZFsR7FdC4uvB5eKlZ_X4h4GLodzFUAgVeYQMNA7Ns0wcMgB7O/s1600/merry+christmas+blogger+banner.gif"/></a>
</div>

Step 3. Save the gadget and you gadget is in place, Easy.

Followers

Blogumulus by Roy Tanck and Amanda Fazani
Free Blogger Tips, Hacks, Widgets, Templates and more